How to Install (Linux)
Preparation for Installation
The installer are used to install this software. In addition to the main unit “Advance/NeuralMD”, the installer “Advance/NanoLabo Tool” including our modified calculation engines (Quantum ESPRESSO and LAMMPS) is available. Download each of them from the following links.
Installation
In a terminal, change the current working directory to where the installer is located. After granting execute permission, first run the Advance/NeuralMD installer.
$ chmod +x install_neural_linux.bin install_nanolabo_tool_linux.bin
$ ./install_neuralmd_linux.bin
Note
The installer can also run in the console mode (no GUI is displayed, even only the CUI completes the operation). If the installer does not enter console mode at runtime in environment without a GUI, execute as follows.
$ ./install_neuralmd_linux.bin -i console
When the language selection screen appears, select the language to be used during installation (not the language used in the software itself).
Follow the on-screen instructions to set up the installation.
Note
It cannot be installed to a location without write permission. Please specify a location with write permission (e.g. /home/username/AdvanceSoft/NeuralMD) as the installation location or run the installer as a user with write permission.
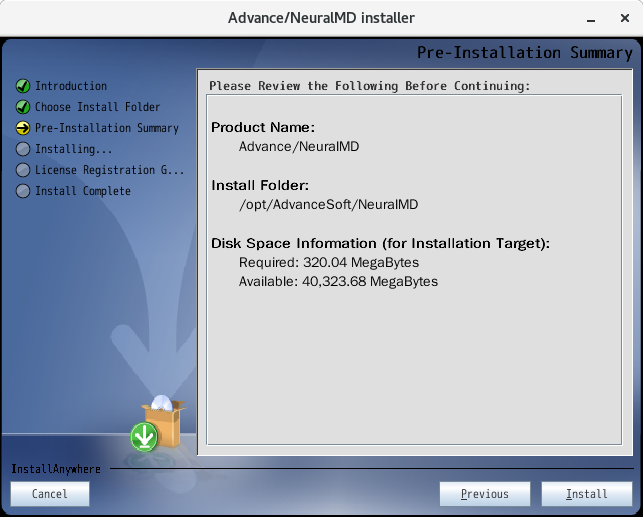
After the setup is complete, a summary screen will appear.

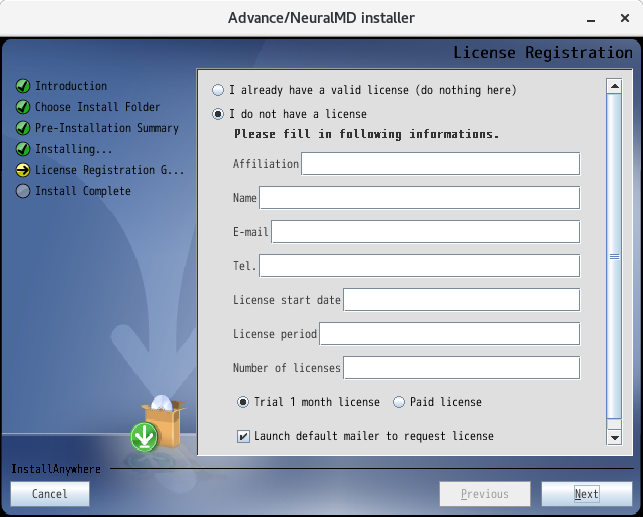
After installation, a guidance screen of the license registration will appear. If you have not yet registered your license, please fill in the required fields. Click Next to view the contents of the license registration e-mail and send it to us.

Note
If “Host ID” in the body of the e-mail is blank, the redhat-lsb library required when obtaining Host ID may not be installed. In that case, execute the following command with root privileges to install it.
# yum -y install redhat-lsb-core
Click “Back” once in the installer and then click “Next” again to retry to obtain a Host ID.
Clicking Finish on the last screen will complete the Advance/NeuralMD installation.
Then run the Advance/NanoLabo Tool installer.
$ ./install_nanolabo_tool_linux.bin
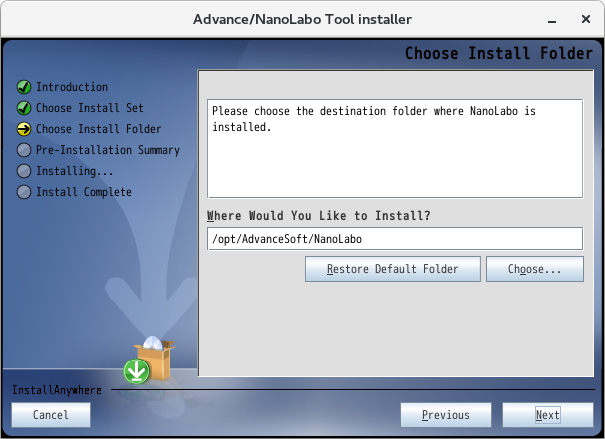
Follow the on-screen instructions to set up the installation.

After the installation, click Finish on the last screen to complete the installation of the Advance/NanoLabo Tool.
For information on how to use the calculation engines (Quantum ESPRESSO and LAMMPS) included with the Advance/NanoLabo Tool, please refer to Calculation Engines included in Nanolabo Tool.
Since the dynamic library in mpi/lib is required when running NeuralMD, execute the following to set up the environment variable LD_LIBRARY_PATH.
export LD_LIBRARY_PATH=/opt/AdvanceSoft/NeuralMD/mpi/lib:$LD_LIBRARY_PATH
In addition, the environment variable PATH and that of OPAL_PREFIX for Open MPI must be set, execute the followings.
export PATH=/opt/AdvanceSoft/NeuralMD/mpi/bin:$PATH
export OPAL_PREFIX=/opt/AdvanceSoft/NeuralMD/mpi
Note
The MPI executable files and libraries are included in both the NeuralMD main unit installer and the NanoLabo Tool installer.
The former is located in the mpi and the latter in the exec.LINUX/mpi directory in the installation location.
The contents are the same, so you only need to set one of them in the environment variable.
It is also helpful to set the path to the NeuralMD executable in the environment variable PATH.
export PATH=/opt/AdvanceSoft/NeuralMD/bin:$PATH
License Configuration
A license file will be sent within 5 business days after license registration in principle.
A license server (program for license authentication) must be running while you use this software. A valid license is required to use the functions to train neural networks (sannp --train, sannp --train-charge, sannp --classical). No license is required for the other functions and for running Quantum ESPRESSO and LAMMPS. The slhmc (the self-learning hybrid Monte Carlo method executable) does not require a license to run by itself, but does require a license to call the sannp to train a neural network.
Operate from Windows
You can use our tool remoteLicense to easily launch the license server on Linux machine from Windows.
Below is the outline of procedure. Please refer to the manual for detail.
Install it using the remoteLicense installer and launch it.
On Host tab, enter the connection information to the Linux machine.
On License tab, choose the license file.
On Start tab, click Execute `lmgrd’ button to launch the license server.
Operate on Linux
Copy the license file ( neumd.lic ) to the license folder of the installation location.
The license server executable is license/lmgrd in the installation location. After changing the current working directory to the installation location in the terminal, start it as shown in the following command example.
$ license/lmgrd -c license/neumd.lic -l license/lmgrd.log
To display the license server status, use license/lmstat in the installation location.
$ license/lmstat -a -c license/neumd.lic
Also, to terminate the license server, use license/lmdown in the installation location.
$ license/lmdown -c license/neumd.lic
At runtime, the environment variable ADVANCED_LICENSE_FILE must be set to the path of the license file.
export ADVANCED_LICENSE_FILE=/opt/AdvanceSoft/NeuralMD/license/neumd.lic
Floating license
The license issued for a linux machine is floating license, and you can use NeuralMD on other connected machines via the network.
Machine to be used as license server
Obtain the HostID and request the license by using remoteLicense from another Windows machine or installing NeuralMD to the machine itself. Once you get the license file, launch the license server by using remoteLicense or directly on the machine.
Machine to be a client to use NeuralMD
Install NeuralMD, copy the same license file to
licensedirectory in the installation destination and set the path inADVANCED_LICENSE_FILE.
If license authentication does not work, please check following.
The hostname stored in the license file is used when connecting from the client to the license server. If hostname can not be used for the connection, replace the hostname in the file with the IP address and see if it works.
While the license server is running, license manager daemon
lmgrdand vendor daemonadvancedare launched, and both of them perform network communications. While the port number is dynamically determined (lmgrduses port number 27000-27009), you can specify fixed port number by adding it in the license file, for firewall configuration etc.You can modify the license file with normal text editors as it is a text file. You do not have to re-issue the license by changing the hostname or adding the port number. Modify the file in the same way both for the server side and the client side.
Example where lmgrd uses 30000 and advanced uses 30001 port
Merging license files
If you have already used another product of ours, you can activate multiple products on only one license server by merging license files. Simply combine the .lic files, then delete the duplicate lines ( SERVER , VENDOR , USE_SERVER ) to create a single license file. Then use that file to launch the license server.
file1.lic |
file2.lic |
combined file.lic |
|
|---|---|---|---|
SERVER …
VENDOR …
USE_SERVER
FEATURE ...
... |
SERVER …
VENDOR …
USE_SERVER
FEATURE ...
... |
SERVER …
VENDOR …
USE_SERVER
FEATURE ...
... FEATURE ...
... |
Update/Upgrade
When upgrading from the trial version to the full version, another installation is not required. Only the license file needs to be replaced.
When updating to a new version, it is possible to perform an overwrite install. However, uninstalling the previous version or changing the installation location beforehand is recommended.
Uninstallation
Launch the Change NeuralMD Installation in the _NeuralMD_installation directory in the installation location in the terminal.
$ AdvanceSoft/NeuralMD/_NeuralMD_installation/Change\ NeuralMD\ Installation
Follow the on-screen instructions to uninstall the software.
After uninstalling Advance/NeuralMD, uninstall Advance/NanoLabo Tool in the same manner.
Note
During uninstallation, the license file in the installation location will not be deleted but remain. In addition, the installation log file may also remain. In such cases, please delete the files manually.